
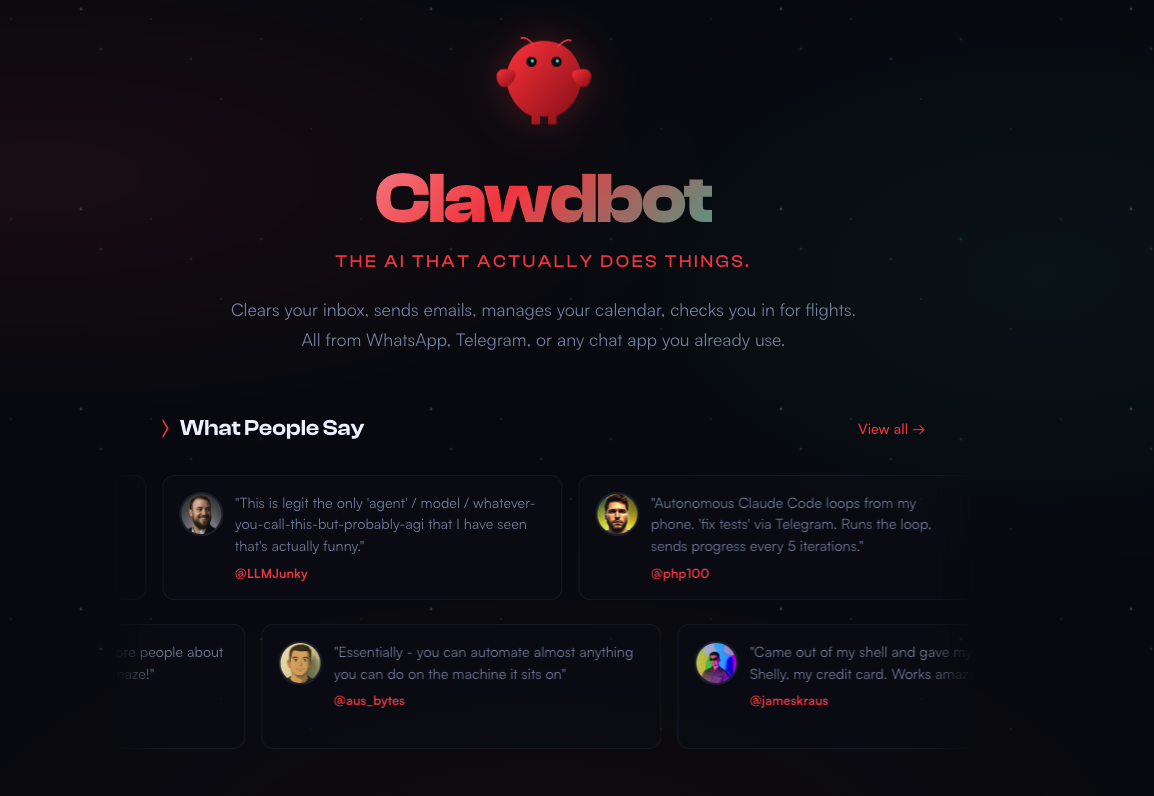
How to Install Moltbot(Clawdbot) on BrainHost VPS
Moltbot is a personal AI assistant you run yourself. To keep it online 24/7, the simplest approach is a VPS that stays up even when your laptop is closed.
Marcus Johnson
Site Reliability Engineer (SRE)
Jan 27, 2026
12 min read

This BrainHost guide adapts the community “full setup in ~30 minutes” flow to a clean, repeatable VPS installation: deploy Ubuntu, install Moltbot, run the onboarding wizard, connect Telegram, and secure access.
What you’ll build
- A BrainHost Ubuntu VPS (KVM + NVMe) hosting your always-on Moltbot Gateway
- A Telegram bot as your chat interface (works well for remote control)
- A private dashboard reachable via SSH tunnel (no public dashboard port)
Requirements
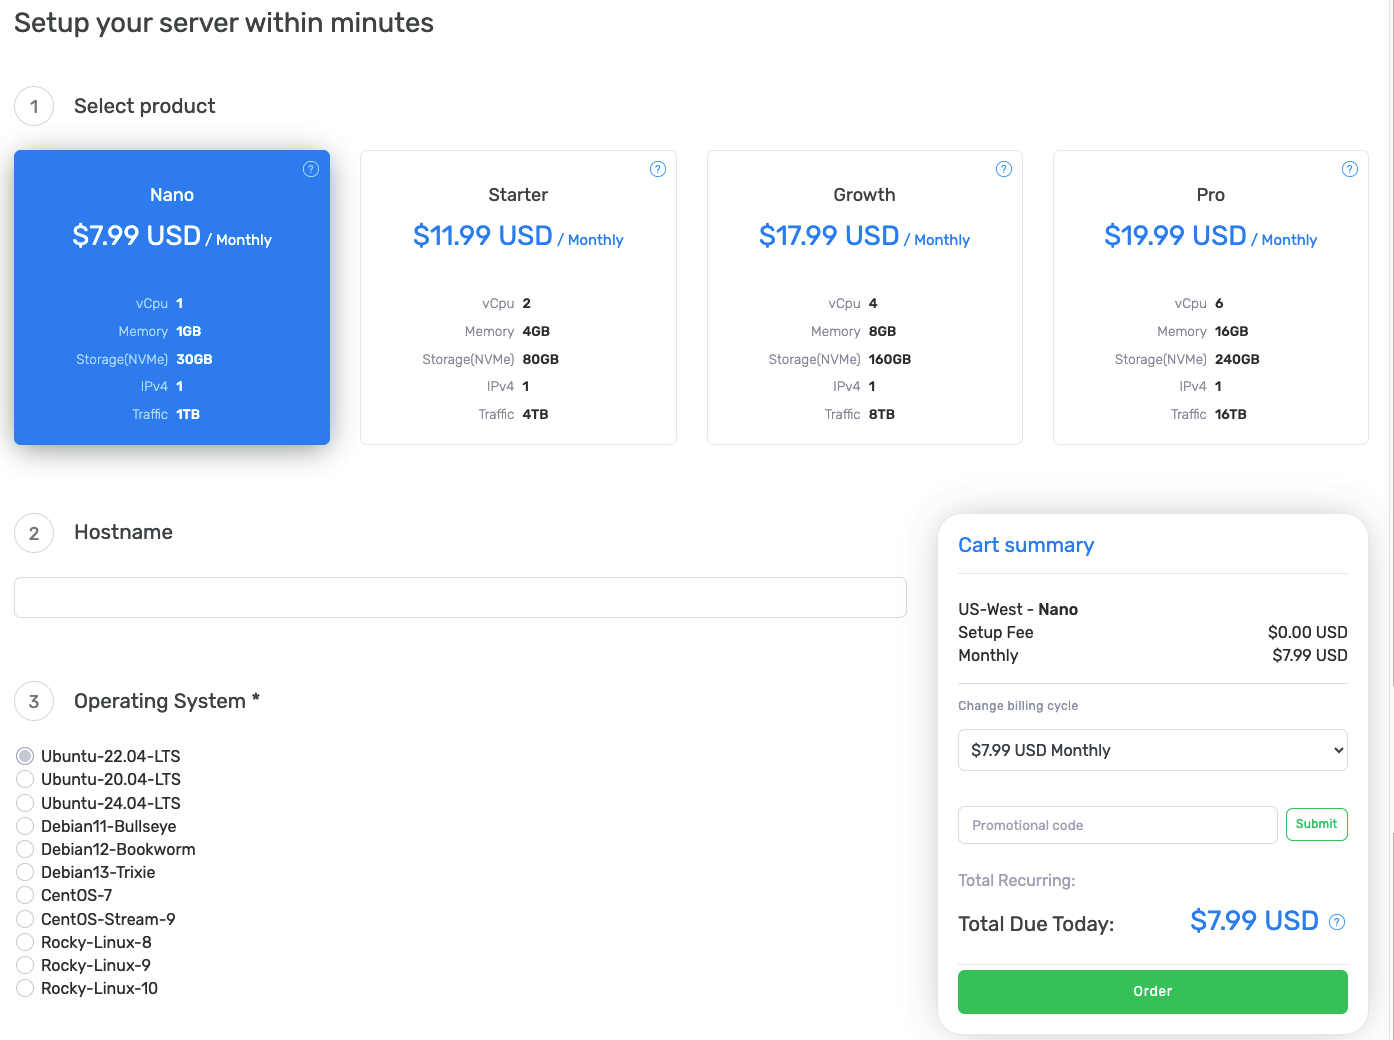
- A BrainHost VPS with Ubuntu 22.04 LTS (recommended)
- SSH access to the server
- Telegram account (to create a bot token)
- Node.js 22+ (Moltbot runtime requirement)
Recommended sizing:
- 1 vCPU / 1–2GB RAM is fine for a basic personal setup
- Go bigger if you plan multiple channels, heavy tools, or lots of logs
Click here to make a direct purchase
Step 1 — Create a BrainHost Ubuntu VPS
- In BrainHost, choose Ubuntu VPS Hosting
- Select Ubuntu 22.04 LTS
- Deploy (BrainHost advertises ~30s instant deploy on Ubuntu VPS plans)
When the VPS is ready, note your:
- Public IP
- SSH username (often
rootorubuntudepending on image/panel) - SSH password or SSH key
Step 2 — SSH in and do basic server prep
SSH into the server:
ssh root@YOUR_VPS_IP
Update packages:
apt update && apt -y upgrade
(Optional but recommended) Create a non-root user:
adduser clawdbot
usermod -aG sudo clawdbot
su - clawdbot
Step 3 — Install Moltbot (fast path)
The community “30-minute setup” uses the official installer script:
curl -fsSL https://clawd.bot/install.sh | bash
This installer helps ensure Node 22+ is available and installs the latest Moltbot CLI.
If you want to see installer options:
curl -fsSL https://clawd.bot/install.sh | bash -s -- --help

Step 4 — Run the onboarding wizard and install the service
Moltbot’s recommended setup is the onboarding wizard. On Linux VPS, you typically want it installed as a background service so it stays running after logout/reboot.
Run:
clawdbot onboard --install-daemon
In the wizard, you’ll generally configure:
- Gateway mode (remote/VPS)
- Your model/provider auth (OAuth or API key depending on provider)
- Channel (Telegram in this guide)
- Background service install (systemd user service by default)
After onboarding, the Gateway should be running.
Quick checks:
clawdbot --version
clawdbot gateway status
Step 5 — Open the dashboard safely (SSH tunnel)
Moltbot’s Control UI is typically on loopback:
http://127.0.0.1:18789/
Instead of exposing this port publicly, tunnel it from your laptop:
ssh -N -L 18789:127.0.0.1:18789 clawdbot@YOUR_VPS_IP
Now open on your local machine:
This keeps the dashboard private and is the recommended “remote VPS” workflow.
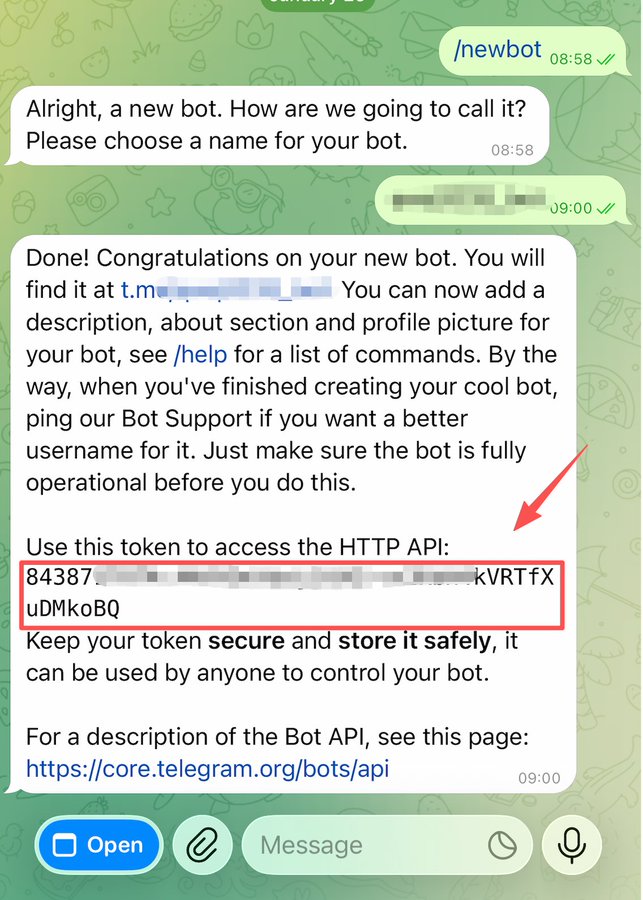
Step 6 — Create a Telegram bot token (BotFather)
In Telegram:
- Open @BotFather
- Send:
/newbot - Pick a bot name and username (must end with
bot) - Copy the token (keep it secret)
You’ll paste this token into the onboarding wizard if you selected Telegram there.
Step 7 — Restrict access (pairing + allowlist)
7.1 Pairing (default for Telegram DMs)
With Telegram DMs, Moltbot defaults to a pairing flow: unknown senders get a short pairing code and messages won’t be processed until you approve.
List pending pairing requests:
clawdbot pairing list telegram
Approve a pairing code:
clawdbot pairing approve telegram <CODE>
7.2 Add an allowlist (recommended)
The “30-minute setup” walkthrough suggests grabbing your Telegram user ID (commonly via a helper bot like @userIDbot) and using it so only you can talk to your Moltbot.
If you use the wizard, it may ask for your user ID and apply this automatically.
If configuring manually later, look for Telegram channel settings like:
channels.telegram.dmPolicy: "pairing"- allowlist/allow-from settings (per the docs)
Also note: pairing + allowlists are stored under ~/.clawdbot/credentials/ on the Gateway host—treat that directory as sensitive.
Step 8 — (Optional) Telegram in groups
If you want your bot in a Telegram group:
- Add the bot to the group
- Decide whether it should see all messages
- Telegram has “Privacy Mode” for bots; disabling privacy or granting admin changes what the bot receives
In Moltbot config, you can enforce group safety behaviors like “require mention” and allowlists per group.
Troubleshooting
Dashboard won’t load
- Make sure the SSH tunnel is running
- Confirm the gateway is up:
clawdbot gateway status
Telegram messages aren’t processed
- Ensure the token is correctly set (wizard or env/config)
- Check pairing requests and approve your sender
- Tail logs:
clawdbot logs --follow
Node version issues
Moltbot requires Node 22+. Verify:
node -v
References
Tags
Marcus Johnson
Site Reliability Engineer (SRE)
Site Reliability Engineer with expertise in monitoring and incident response.
Related Articles

How to Install Docker: Step-by-Step Tutorial
Follow this detailed Docker installation tutorial for servers. Get clear instructions, troubleshooting tips, and best practices to run Docker in minutes.
Practical VPS Guide for Engineers: From Hobby to Production
A comprehensive guide for engineers covering VPS fundamentals, virtualization stack, practical use cases, best practices for networking, storage, security, and building a production-ready system.
-Intelligence.webp)
Vultr vs BrainHost: In-Depth VPS Hosting Comparison for 2026
Compare BrainHost and Vultr VPS hosting in terms of pricing, performance, infrastructure, and real-world use cases to find the right VPS provider in 2026.
BrainHost - A reliable VPS hosting platform offering high-performance virtual servers with advanced management capabilities.