
Installing WordPress with Docker Compose (Using BrainHost KVM VPS as an Example)
In 2025, WordPress is still one of the most popular open-source content management systems (CMS) in the world. Blogs, company websites, e-commerce stores, and landing pages all rely heavily on it.
Marcus Johnson
Site Reliability Engineer (SRE)
Nov 27, 2025
7 min read
Traditionally, WordPress is deployed by installing a full LAMP/LEMP stack (Linux + web server + MySQL + PHP), which can be tedious to set up and maintain over time.
With Docker + Docker Compose, we can break the stack into separate containers—web server, PHP-FPM, MySQL, certificate management—and orchestrate them with a single docker-compose.yml file. This greatly simplifies the deployment process and makes the environment more standardized, portable, and easy to reproduce.
If you combine this with a high-performance VPS, such as a BrainHost.ai KVM VPS (NVMe storage + ~30s provisioning), you can go from “empty server” to “live HTTPS WordPress site” in just a few minutes.
In this guide, you’ll:
- Use Docker Compose to run 4 containerized services:
- MySQL database
- WordPress (PHP-FPM)
- Nginx web server
- Certbot (for Let’s Encrypt free SSL certificates)
- Configure HTTPS with Let’s Encrypt and set up automatic certificate renewal
- See how this architecture fits perfectly on a BrainHost VPS so you can get from 0 to production quickly
1. Prerequisites
To follow along, you’ll need the following (Ubuntu 22.04+ is recommended):
1.1 A Linux server (BrainHost KVM VPS recommended)
You can use any cloud provider, but here we’ll recommend a BrainHost.ai KVM VPS, because:
- KVM virtualization + NVMe SSD means great I/O performance, ideal for MySQL and static asset delivery in WordPress
- Regions in Hong Kong and US-West, suitable for both Asia and North America access scenarios
- A control panel for one-click reinstall, reboot, and system recovery, which is convenient for debugging Docker setups
- VPS usually provisions in about 30 seconds. For example, the US-West Nano plan can be as low as $0.08 for the first month/year with a limited-time 99% OFF promo
Once you’ve picked a plan, SSH into your VPS and create a normal user with sudo privileges.
1.2 Docker and Docker Compose installed
On the server, install Docker and Docker Compose:
# Update system
sudo apt update && sudo apt upgrade -y

# Install Docker
curl -fsSL https://get.docker.com | sh

# Install Docker Compose (v2.x plugin)
sudo apt install docker-compose-plugin -y
1.3 A domain name pointing to your server
Assume your domain is your_domain. Create the following DNS records:
your_domain→ A record pointing to your server’s public IPwww.your_domain→ A record pointing to your server’s public IP
If you’re using a BrainHost VPS, simply point your A records to the IP assigned by BrainHost.
1.4 Firewall allowing ports 80 and 443
Open SSH, HTTP, and HTTPS in your firewall:
sudo ufw allow OpenSSH
sudo ufw allow 80/tcp
sudo ufw allow 443/tcp
sudo ufw enable
2. Architecture Overview
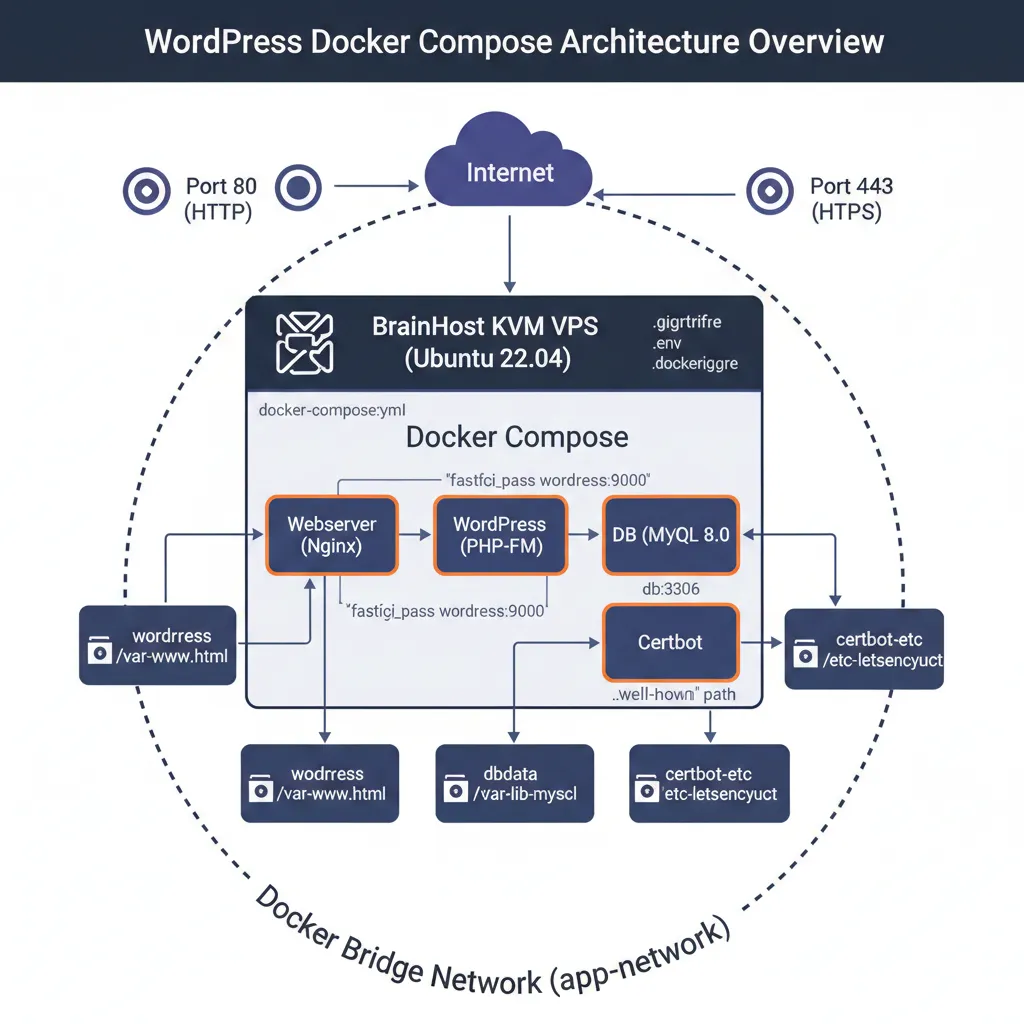
We’re going to build the following setup:
- Nginx container: serves HTTP/HTTPS and proxies requests to WordPress (PHP-FPM)
- WordPress container: runs PHP-FPM and WordPress application logic
- MySQL container: stores site data (posts, users, settings, etc.)
- Certbot container: obtains and renews Let’s Encrypt certificates
All four containers communicate on a custom Docker bridge network (e.g., app-network), and only ports 80 and 443 are exposed to the outside world. Data is persisted using Docker named volumes, so even if containers are recreated, your data is preserved.
3. Step 1: Create Project Directory and Nginx Config
3.1 Create directories
mkdir ~/wordpress
cd ~/wordpress
mkdir nginx-conf
3.2 Create an Nginx HTTP config
Create the config file:
nano nginx-conf/nginx.conf
Add a basic HTTP (port 80) config that we’ll use later to obtain certificates:
server {
    listen 80;
    listen [::]:80;

    server_name your_domain www.your_domain;
    index index.php index.html index.htm;

    root /var/www/html;

    # Let’s Encrypt HTTP-01 challenge directory
    location ~ /.well-known/acme-challenge {
        allow all;
        root /var/www/html;
    }

    # Route all requests through WordPress front controller
    location / {
        try_files $uri $uri/ /index.php$is_args$args;
    }

    # PHP-FPM handling
    location ~ \.php$ {
        try_files $uri =404;
        fastcgi_split_path_info ^(.+\.php)(/.+)$;
        fastcgi_pass wordpress:9000;
        fastcgi_index index.php;
        include fastcgi_params;
        fastcgi_param SCRIPT_FILENAME $document_root$fastcgi_script_name;
        fastcgi_param PATH_INFO $fastcgi_path_info;
    }

    # Deny .ht* files
    location ~ /\.ht {
        deny all;
    }

    # Small optimization for static files
    location = /favicon.ico { access_log off; log_not_found off; }
    location = /robots.txt  { access_log off; log_not_found off; allow all; }

    location ~* \.(css|gif|ico|jpeg|jpg|js|png)$ {
        expires max;
        log_not_found off;
    }
}
Save and exit.
Note:
fastcgi_pass wordpress:9000useswordpressas the hostname—that’s the service name we’ll define for the WordPress container in Docker Compose.
4. Step 2: Use .env to Store Sensitive Environment Variables
To avoid hardcoding database passwords in docker-compose.yml, we’ll store them in a .env file and reference that in our Compose config.
4.1 Create .env
nano .env
Example:
# MySQL
MYSQL_ROOT_PASSWORD=your_root_password
MYSQL_USER=your_wp_user
MYSQL_PASSWORD=your_wp_password

# General settings
WORDPRESS_DB_NAME=wordpress
4.2 Ignore .env in Git
If you use Git for version control, create a .gitignore:
nano .gitignore
Add:
.env
4.3 Ignore .env in Docker builds
Similarly, create .dockerignore:
nano .dockerignore
Example content:
.env
.git
.dockerignore
docker-compose.yml
This helps keep sensitive info and unnecessary files out of your images.
5. Step 3: Create docker-compose.yml (Four Services)
Next, we’ll define all four services—database, WordPress, Nginx, and Certbot—in one Compose file.
nano docker-compose.yml
Example configuration:
version: '3'

services:
  db:
    image: mysql:8.0
    container_name: db
    restart: unless-stopped
    env_file: .env
    environment:
      - MYSQL_DATABASE=${WORDPRESS_DB_NAME:-wordpress}
    volumes:
      - dbdata:/var/lib/mysql
    command: '--default-authentication-plugin=mysql_native_password'
    networks:
      - app-network

  wordpress:
    depends_on:
      - db
    image: wordpress:php8.2-fpm-alpine
    container_name: wordpress
    restart: unless-stopped
    env_file: .env
    environment:
      - WORDPRESS_DB_HOST=db:3306
      - WORDPRESS_DB_USER=${MYSQL_USER}
      - WORDPRESS_DB_PASSWORD=${MYSQL_PASSWORD}
      - WORDPRESS_DB_NAME=${WORDPRESS_DB_NAME:-wordpress}
    volumes:
      - wordpress:/var/www/html
    networks:
      - app-network

  webserver:
    depends_on:
      - wordpress
    image: nginx:1.25-alpine
    container_name: webserver
    restart: unless-stopped
    ports:
      - "80:80"
    volumes:
      - wordpress:/var/www/html
      - ./nginx-conf:/etc/nginx/conf.d
      - certbot-etc:/etc/letsencrypt
    networks:
      - app-network

  certbot:
    depends_on:
      - webserver
    image: certbot/certbot
    container_name: certbot
    volumes:
      - certbot-etc:/etc/letsencrypt
      - wordpress:/var/www/html
    command: >
      certonly --webroot
      --webroot-path=/var/www/html
      --email you@example.com
      --agree-tos
      --no-eff-email
      --staging
      -d your_domain
      -d www.your_domain

volumes:
  certbot-etc:
  wordpress:
  dbdata:

networks:
  app-network:
    driver: bridge
Quick notes:
dbservice- Uses
mysql:8.0and stores data in thedbdatavolume --default-authentication-plugin=mysql_native_passwordensures compatibility with WordPress’s MySQL client
- Uses
wordpressservice- Uses the
wordpress:php-fpm-alpinevariant with PHP-FPM built in - Reads DB credentials from
.env
- Uses the
webserverservice- Exposes port 80 on the host
- Mounts the WordPress code, Nginx config directory, and Let’s Encrypt certs directory
certbotservice- Uses
webrootmode for HTTP-01 challenge - Initially runs with
--stagingto test without hitting rate limits
- Uses
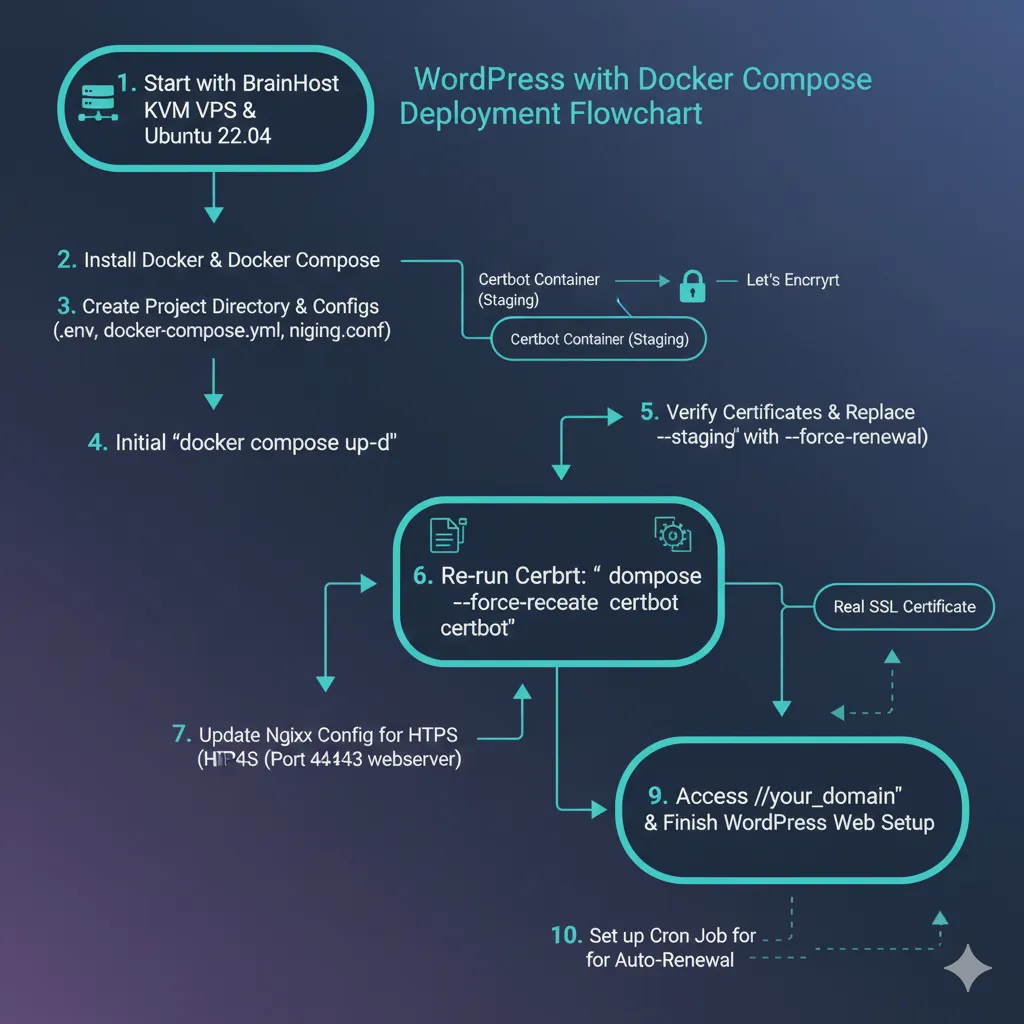
6. Step 4: Start Containers and Obtain SSL Certificates
6.1 Start all services
docker compose up -d
(If you’re on an older system, docker-compose up -d also works.)
6.2 Check container status
docker compose ps
You should see:
db,wordpress, andwebserveras Upcertbotas Exit 0, which means it completed successfully
6.3 Verify certificates inside the Nginx container
docker compose exec webserver ls -la /etc/letsencrypt/live
If you see a directory named after your domain (e.g., your_domain), the test certificate was generated successfully.
6.4 Switch from staging to production
Edit docker-compose.yml and replace --staging with --force-renewal in the certbot command. Then run:
docker compose up --force-recreate --no-deps certbot
This time, Certbot will request a real production certificate.
7. Step 5: Enable HTTPS in Nginx
Now that the certificates live under /etc/letsencrypt/live/your_domain, we can update the Nginx config to serve HTTPS.
Edit nginx-conf/nginx.conf and add an HTTPS server block alongside (or in addition to) the existing HTTP one:
server {
    listen 443 ssl http2;
    listen [::]:443 ssl http2;
    server_name your_domain www.your_domain;

    root /var/www/html;
    index index.php index.html index.htm;

    ssl_certificate     /etc/letsencrypt/live/your_domain/fullchain.pem;
    ssl_certificate_key /etc/letsencrypt/live/your_domain/privkey.pem;

    # Optional: add extra security headers or TLS settings here

    location / {
        try_files $uri $uri/ /index.php$is_args$args;
    }

    location ~ \.php$ {
        try_files $uri =404;
        fastcgi_split_path_info ^(.+\.php)(/.+)$;
        fastcgi_pass wordpress:9000;
        fastcgi_index index.php;
        include fastcgi_params;
        fastcgi_param SCRIPT_FILENAME $document_root$fastcgi_script_name;
        fastcgi_param PATH_INFO $fastcgi_path_info;
    }

    location ~ /\.ht {
        deny all;
    }
}
You can then convert the original HTTP server on port 80 into a simple redirect to HTTPS:
server {
    listen 80;
    listen [::]:80;
    server_name your_domain www.your_domain;
    return 301 https://$host$request_uri;
}
Restart Nginx to apply the changes:
docker compose restart webserver
8. Step 6: Finish WordPress Setup via Web Installer
Open your browser and navigate to:
https://your_domain
You should see the WordPress installation wizard:
- Choose your language
- Enter site title
- Create admin username and password
- Complete the installation and log into the dashboard
At this point, your Docker Compose-based WordPress site is fully up and running with HTTPS enabled.
9. Step 7: Set Up Automatic Certificate Renewal (cron)
Let’s Encrypt certificates are usually valid for 90 days. We need a scheduled job to run certbot renew periodically and reload Nginx when certificates are renewed.
On the host machine:
sudo crontab -e
Add a cron entry (e.g., run every day at 3 AM):
0 3 * * * docker compose run --rm certbot renew && docker compose exec webserver nginx -s reload
This way, your certificates will stay valid without manual intervention.
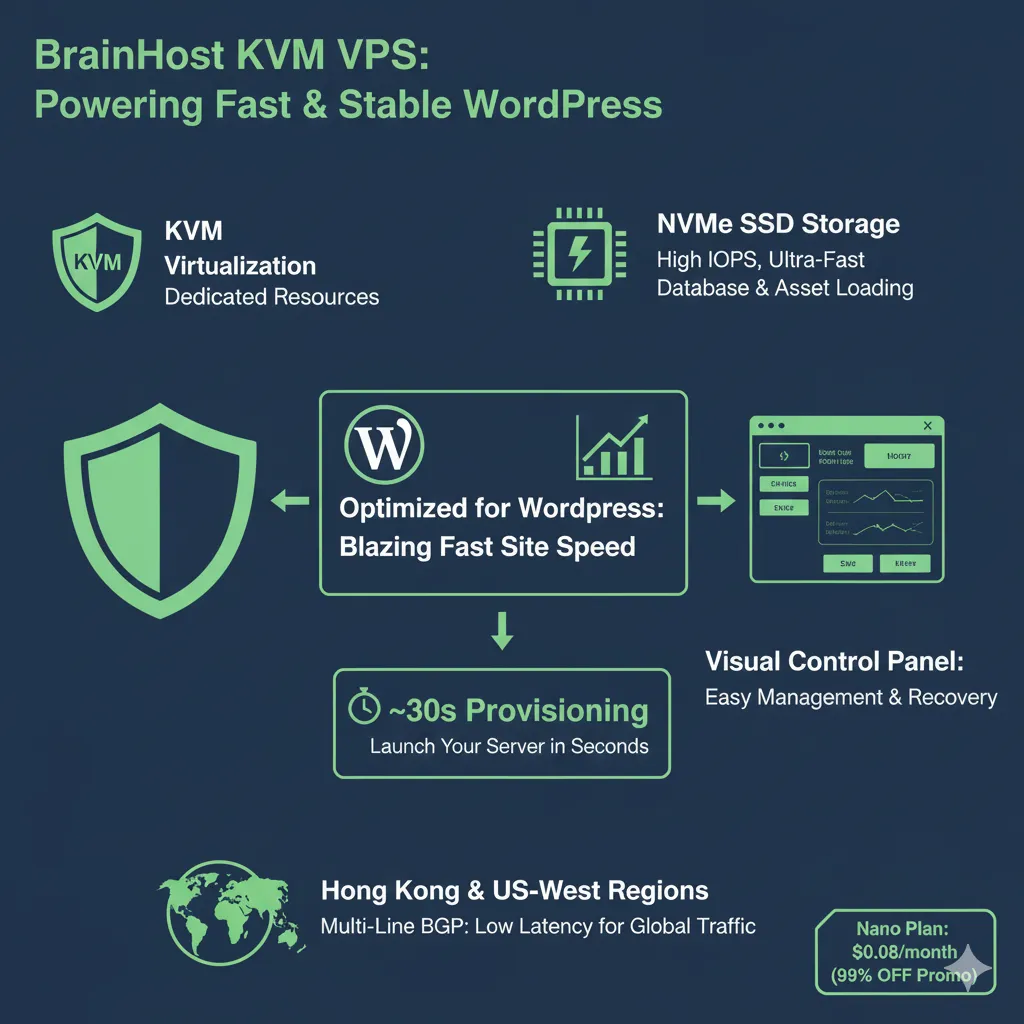
10. Why Deploy Docker + WordPress on BrainHost VPS?
 Throughout this guide, server performance and network quality are critical to your site’s responsiveness, admin experience, and backup/upgrade workflow. Here’s why this stack fits very well on BrainHost.ai:
- KVM + NVMe: perfect for databases and dynamic sites
- KVM virtualization with NVMe SSD delivers stable CPU performance and high IOPS
- Ideal for MySQL random I/O and serving WordPress media and static assets quickly
- ~30s provisioning: ideal for experiments and frequent deployments
- Your VPS is usually ready in about half a minute after payment
- Great for testing new Docker Compose setups or spinning up multiple WordPress sites for SEO experiments
- Visual control panel reduces ops overhead
- You can reboot, reinstall OS, or access console directly from the panel
- If your containers or system config break, you can quickly jump into the console and debug
- Friendly for users who don’t want everything purely in the CLI
- Multi-line BGP and smart routing
- Hong Kong and US-West regions with multi-line BGP provide relatively stable latency for domestic and international visitors
- Very helpful if your WordPress site relies on global traffic and search engines
- High cost-performance for multi-site setups
- The US-West Nano plan can be as low as $0.08 for the first month/year with a 99% OFF promo
- You can run multiple Dockerized WordPress sites on a single machine, making the cost per site very low
If you’re planning to build a WordPress network, content farm, or blog cluster, Docker Compose + BrainHost VPS is a highly efficient and repeatable combination. Just treat this project directory as a template, change the domain and
.envvalues, and you can spin up a new stack on a new server in minutes.
Conclusion
In this tutorial, you’ve learned how to:
- Use Docker Compose to orchestrate MySQL, WordPress, Nginx, and Certbot
- Safely manage database credentials and other secrets with a
.envfile - Enable HTTPS for your WordPress site with Let’s Encrypt and automate certificate renewal with cron
- Deploy this architecture on a high-performance BrainHost KVM VPS so WordPress stays fast and stable
From here, you can:
- Clone this setup into multiple directories like
~/wordpress-site1,~/wordpress-site2, etc., and host multiple WordPress sites on the same BrainHost VPS - Enhance Nginx with multi-site or reverse proxy configuration to centralize management
- Put
docker-compose.ymland related config into a Git repo and turn this into your standard, reusable deployment template
Once you have a BrainHost VPS and you’ve completed the steps in this guide, your WordPress production environment becomes replicable, portable, and easy to maintain—upgrading PHP, migrating data, or scaling to multiple sites will be much simpler going forward.
Tags
Marcus Johnson
Site Reliability Engineer (SRE)
Site Reliability Engineer with expertise in monitoring and incident response.
Related Articles

How to Install Docker: Step-by-Step Tutorial
Follow this detailed Docker installation tutorial for servers. Get clear instructions, troubleshooting tips, and best practices to run Docker in minutes.
DigitalOcean vs BrainHost: VPS Comparison for Developers (2026)
A developer-focused comparison of DigitalOcean vs BrainHost VPS hosting, covering performance, pricing, infrastructure, and real-world use cases in 2026.
Hostinger vs BrainHost: Best VPS for Performance & Design? (2026)
Compare Hostinger vs BrainHost 2026: Pricing, performance, landing page & logo tools. Discover why BrainHost's KVM VPS suits power users & beginners.
BrainHost - A reliable VPS hosting platform offering high-performance virtual servers with advanced management capabilities.