
Building a Remote Access Environment with VPS: Access Your Home Network Anytime, Anywhere
When you travel frequently and need external access to devices on your home network, the common solution is to use tools like Tailscale, Zerotier, or Hamachi to form a virtual local area network (LAN), achieving the goal of remote networking and NAT traversal.
Alex Chen
DevOps Engineer
Oct 22, 2025
5 min read
These tools are essentially P2P Virtual LAN (or Zero Trust Network Access, ZTNA) solutions. They utilize a central coordination server to help your home devices and external devices establish an encrypted, peer-to-peer virtual tunnel, making your external device function as if it were physically connected to your home router. This allows direct access to any device on your home network, such as NAS, smart home controllers, or network cameras.
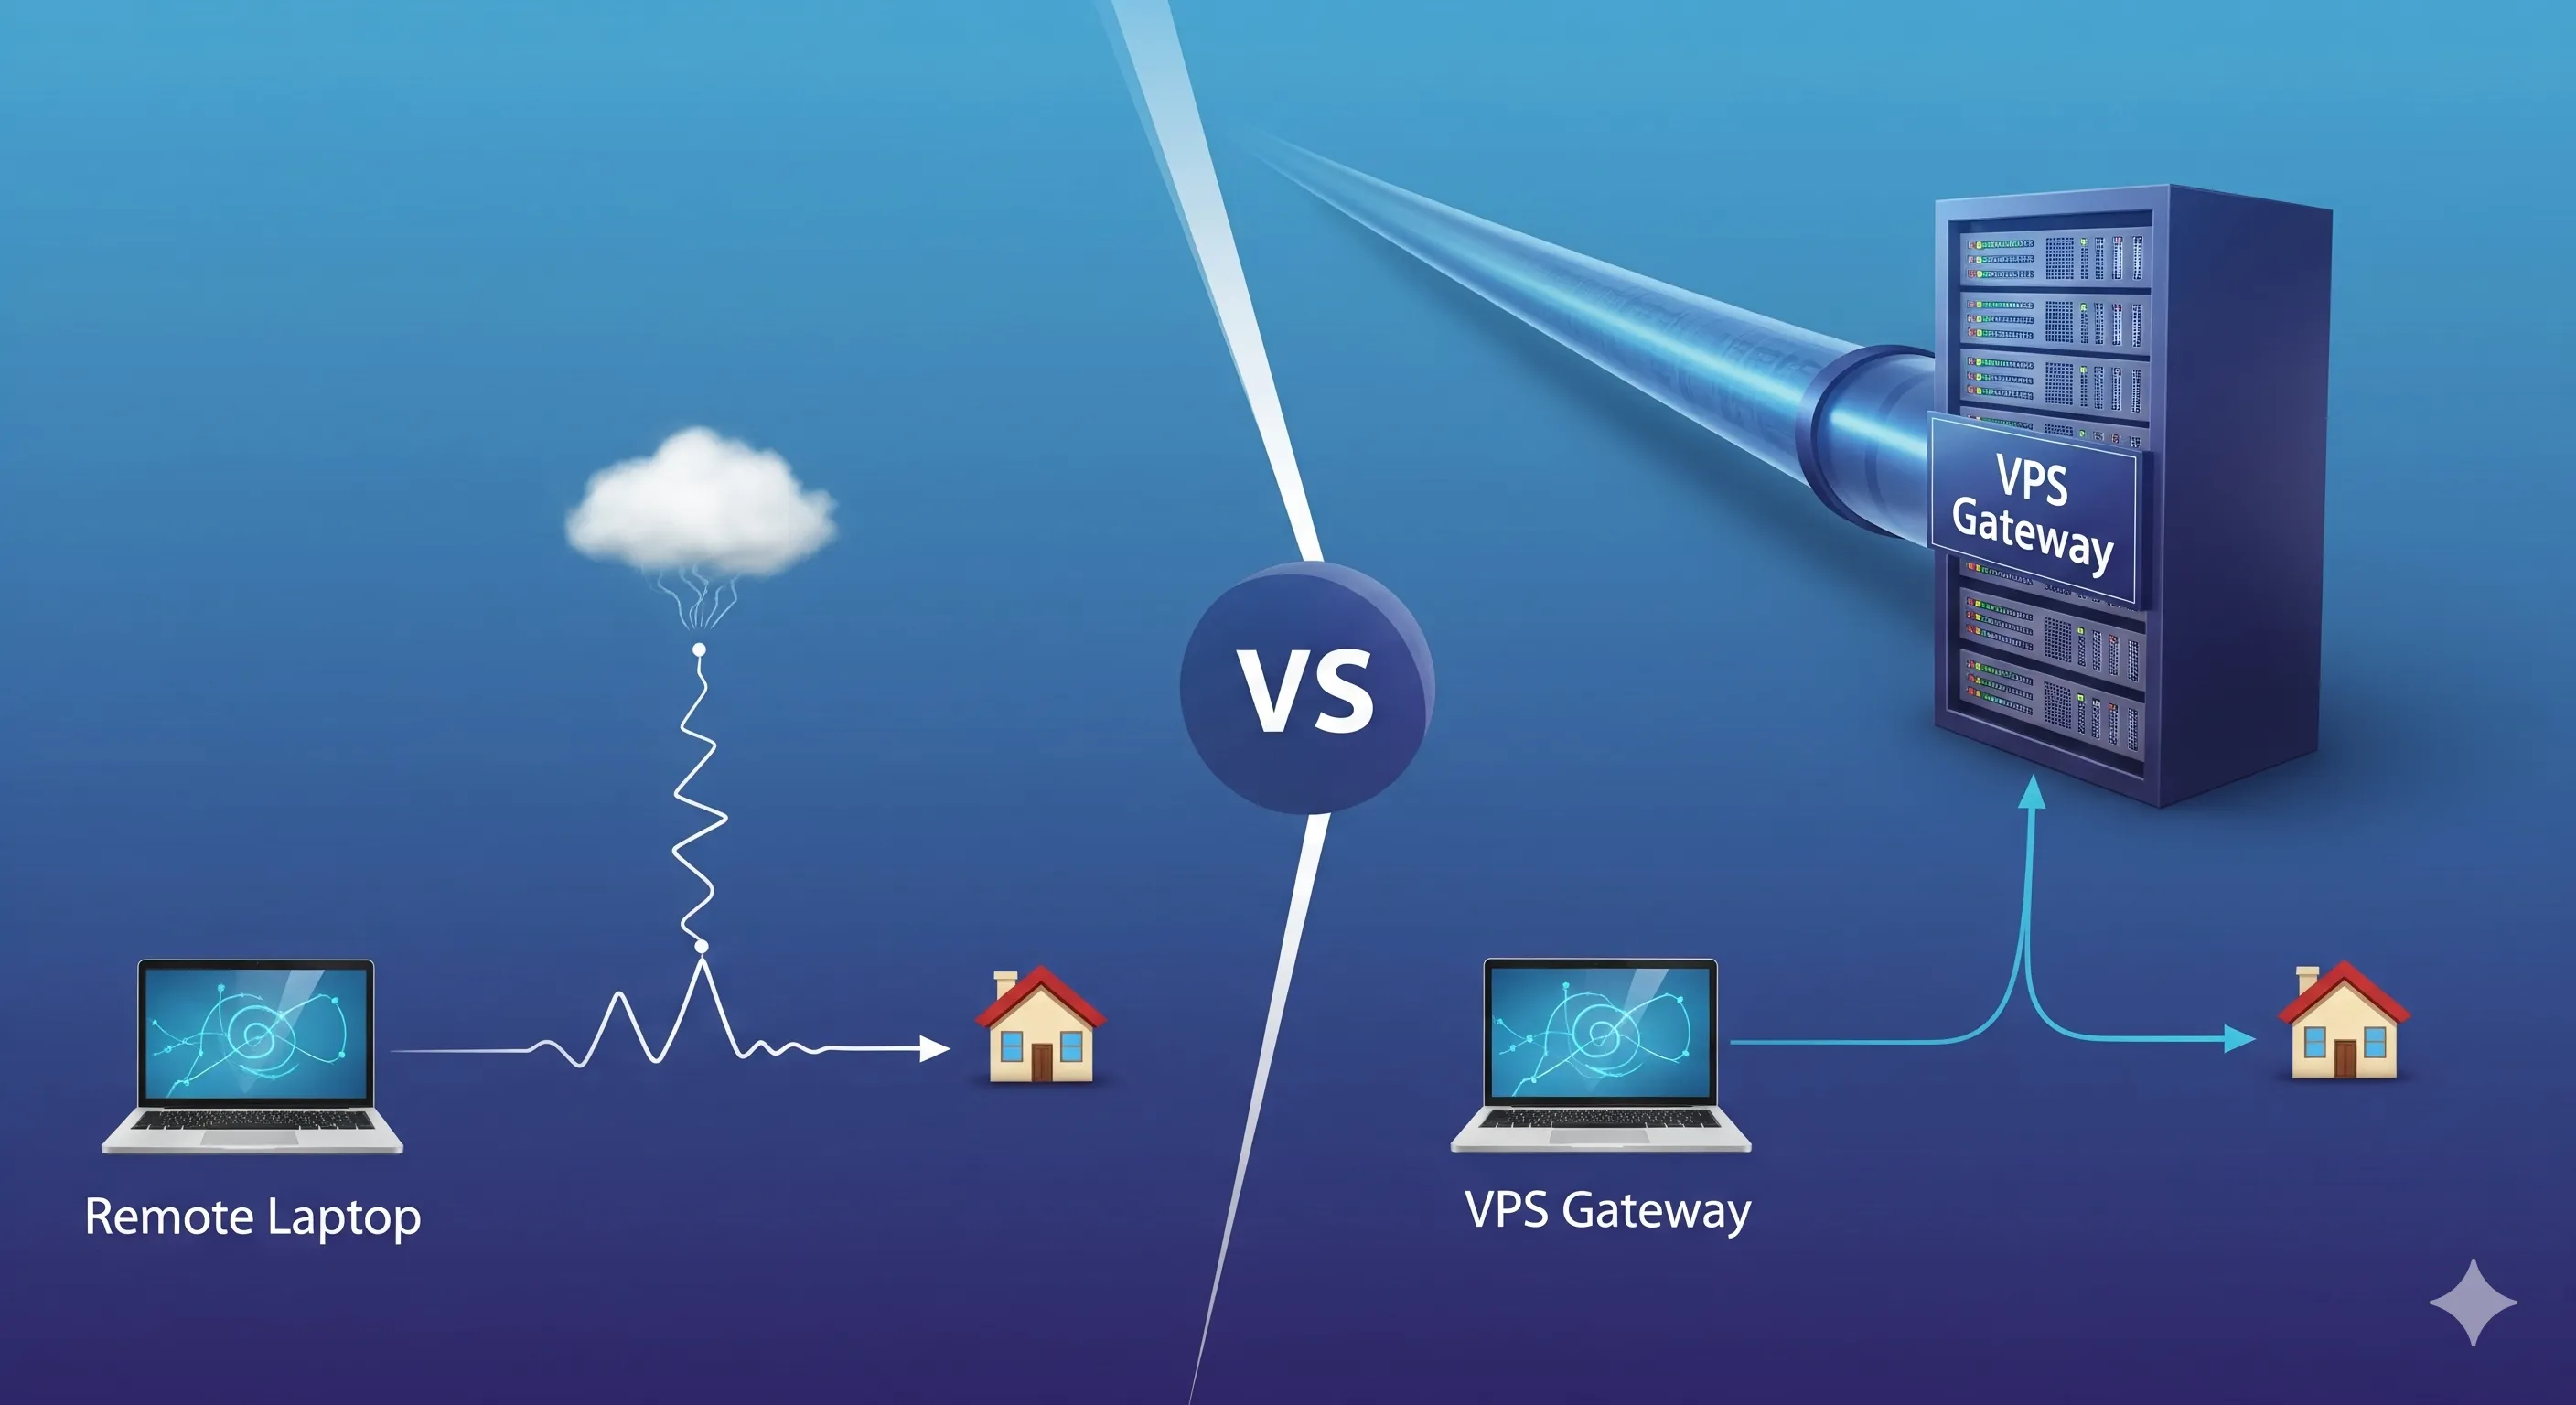
Pros and Cons of P2P Remote Networking Solutions (Tailscale/Zerotier)
Advantages
- No Public IP Required: Most residential broadband lacks a public IP, and these tools automatically handle complex NAT traversal.
- Simple Configuration: Only requires installing the client on all devices needing interconnection and logging in with the same account.
- High Security: The connection is fully encrypted and peer-to-peer; data is not relayed through a third-party server (unless P2P traversal fails).
Disadvantages and Limitations
- Performance Bottleneck and Stability: Although the ideal state is peer-to-peer, the success rate and connection speed of P2P traversal heavily depend on your home broadband's upload speed and complex network environment. If traversal fails, data is forced to route through a third-party central server, which not only increases latency but can also lead to stuttering or unstable access due due to the server's bandwidth limitations.
- Unavoidable Third-Party Dependency: Your virtual network topology and key management rely on the service provider's central server. You have limited control over the network and cannot rule out risks from changes in third-party service policies or privacy breaches.
Advanced Option: The Core Advantage of Using BrainHost VPS to Set Up OpenVPN/WireGuard
For users who pursue ultimate speed, stability, and autonomous control, we recommend a more professional and reliable solution—setting up your exclusive OpenVPN or WireGuard service using your BrainHost VPS.
Your observation is accurate: even when using a VPS to set up a VPN, data transmission *from* the home network will still be limited by the home broadband's upload bandwidth. This is a critical technical detail that cannot be ignored.
In this comparison, we need to precisely articulate the advantages of the VPS solution, focusing on access stability, download performance (from the external device's perspective), and the quality of the relay node, rather than merely claiming that "performance is determined by the VPS."
Solution Comparison: P2P Remote Networking vs. BrainHost VPS VPN
| Advantage Dimension | P2P Remote Networking Solution (Tailscale/Zerotier) | Professional VPS VPN Solution (BrainHost) |
|---|---|---|
| Access Stability | P2P traversal success rate and speed are highly unstable; if traversal fails, data flows through third-party relay, often causing slowdowns. | High Connection Reliability: Traffic is relayed through BrainHost's fixed, high-performance VPS node, ensuring a more stable and reliable connection and avoiding the uncertainty of the P2P mechanism. |
| Download Performance (External Access to Home) | Download speed is constrained by the home network's upload bandwidth, creating a clear speed bottleneck. | Guaranteed High-Quality Node: While download speed is still limited by home upload bandwidth, BrainHost VPS ensures a high-quality, low-latency relay node, effectively preventing extra speed degradation caused by a poor relay node. |
| Upload Performance (External Upload to Home) | Upload speed is limited by the external device's network bandwidth. | Outstanding Speed Advantage: When the external device uploads to the home network, the speed primarily relies on BrainHost VPS's high-speed download bandwidth and the home broadband's download bandwidth, which is usually much higher than home upload bandwidth. |
| Control and Security | Dependent on the third-party central server, vulnerable to its policies and server status. | Complete Autonomous Control: The BrainHost VPS is your exclusive gateway. Configuration and security policies are entirely up to you, eliminating any possibility of third-party relay or monitoring. |
Core Advantage Summary: Why BrainHost VPS is Your Best Choice?
- Say Goodbye to Network Uncertainty: P2P solutions have volatile connection quality and speed. Our BrainHost VPS provides a fixed, high-quality network relay node, ensuring your remote access connection is more stable and has lower latency.
- Optimize Data Flow Efficiency: Your data flows through a BrainHost VPS with professional-grade bandwidth, minimizing performance loss during the relay process. Especially when you need to upload files from the outside to your home network (e.g., NAS), you can fully utilize BrainHost VPS's high-speed download bandwidth for faster speeds.
- Enjoy Absolute Security and Freedom: Establish a completely self-owned, end-to-end encrypted private tunnel. Your network is no longer subject to the policies and privacy terms of any third-party service provider, with configuration and security policies fully under your control.
BrainHost is the best upgrade solution for achieving high-quality, highly efficient, and highly autonomous remote access to your home network.
Practical Guide: Setting Up a Private OpenVPN on Your BrainHost VPS
Since you have chosen the BrainHost solution for ultimate stability and autonomous control, the deployment process that follows will be exceptionally efficient. We recommend using established open-source tools and automated scripts to complete the server-side configuration, simplifying the complex process of certificate and key management.
Step One: Rapid Deployment of OpenVPN Server on BrainHost VPS
To allow even non-technical users to get started quickly, we recommend using a widely recognized one-click installation script from the community. It automatically handles all the tedious backend work, such as certificate generation, key configuration, and firewall settings.
1. Log in to Your VPS
Use an SSH client (such as PuTTY, Xshell, or the terminal on macOS/Linux) to log in to your BrainHost VPS:
Bash
ssh root@YourBrainHost-VPS-IP-Address
2. Run the OpenVPN One-Click Installation Script
Execute the following commands in the VPS command line. This script (provided by the community) will guide you through the OpenVPN installation and configuration:
Bash
wget https://git.io/vpn -O openvpn-install.sh
chmod +x openvpn-install.sh
./openvpn-install.sh
3. Configure According to Script Prompts
When the script runs, you only need to make choices according to the prompts, usually keeping the default options:
- Protocol and Port: We recommend using the UDP protocol and the default port
1194for optimal speed and performance. - Client Name: Enter a client name (e.g.,
HomePC,MobilePhone). - Generate Configuration File: The script will automatically generate a configuration file named
[client-name].ovpnfor you, which contains all the necessary certificates, keys, and network settings for connection.
【Key Artifact】 After the installation is complete, the script will prompt you with the download path of the .ovpn file. Be sure to securely download this file to your local computer. This is the unique key for your client to connect to the BrainHost exclusive gateway.
Step Two: Configure Your Devices (Client Connection)
Whether it is a desktop, laptop, or mobile phone, connecting to your BrainHost VPN only requires two steps: installing the client software and importing the .ovpn configuration file you obtained in the previous step.
| Device Type | Recommended Client Software | Connection Steps |
|---|---|---|
| Windows/macOS | OpenVPN GUI (Windows) or Tunnelblick (macOS) | 1. Download and install the corresponding client software. 2. Double-click or import the .ovpn configuration file. 3. Click connect and enter the client password you set in the VPS script (if applicable). |
| iOS (iPhone/iPad) | OpenVPN Connect (App Store) | 1. Download the OpenVPN Connect app from the App Store. 2. Send the .ovpn file to your device (via email, Airdrop, etc.). 3. In the app, select "Import Profile," find and import the .ovpn file. 4. Click connect. |
| Android | OpenVPN Connect (Google Play) | 1. Download the OpenVPN Connect app from Google Play. 2. Transfer the .ovpn file to your device storage. 3. In the app, select "Import Profile," find and import the .ovpn file. 4. Click connect. |
| Linux | OpenVPN or Network Manager Plugin | 1. Install the OpenVPN package: sudo apt install openvpn (Debian/Ubuntu). 2. Use the command line or Network Manager to import and connect. |
BrainHost Exclusive Advantage: Setting Up Your Home Router
If you want your external device to have full access to all devices on your home network (NAS, printer, smart home), you also need a crucial configuration on your home router: Route Pushing.
In short, you need to install the OpenVPN Client on a device within your home network (e.g., a soft router, a router that supports OpenVPN Client, or an always-on Raspberry Pi) and connect it to your BrainHost VPS.
Once configured, your BrainHost VPS becomes a high-performance, highly stable relay gateway, allowing all remote devices to access your home intranet resources stably, securely, and efficiently through this gateway.
Now, your exclusive remote network environment is complete. Enjoy the speed, security, and freedom that BrainHost VPS brings you!
Tags
Alex Chen
DevOps Engineer
DevOps Engineer specializing in cloud infrastructure and automation.
Related Articles
Practical VPS Guide for Engineers: From Hobby to Production
A comprehensive guide for engineers covering VPS fundamentals, virtualization stack, practical use cases, best practices for networking, storage, security, and building a production-ready system.

How to Install Docker: Step-by-Step Tutorial
Follow this detailed Docker installation tutorial for servers. Get clear instructions, troubleshooting tips, and best practices to run Docker in minutes.
Virtual Private Server Explained: Benefits & Upgrades
A complete guide to VPS: What it is, how it works, how to choose the right solution, benefits, and comparison with other hosting. Includes optimization tips.
BrainHost - A reliable VPS hosting platform offering high-performance virtual servers with advanced management capabilities.